


Priming a coil is one of the most important steps in setting up your vape for a smooth and flavorful experience. Whether you’re a beginner or an experienced vaper, understanding how to prime your coil properly can prevent dry hits, burnt flavors, and premature coil damage. In this article, we’ll walk you through the step-by-step process of priming a coil, ensuring that your vape setup works efficiently and enhances your overall experience.
What Does “Priming a Coil” Mean?
Priming a coil refers to the process of saturating the coil’s wick (usually cotton) with e-liquid before using your vape. This ensures that the cotton inside the coil is fully soaked, preventing it from burning when you start vaping. Failing to prime your coil properly can lead to unpleasant dry hits, burnt tastes, or even damage to the coil itself.
Why Is It Important to Prime a Coil?
Priming your coil is important for several reasons:
- Prevents Dry Hits: If the wick isn’t properly soaked with e-liquid, the coil can overheat and cause a dry hit, which can be harsh and unpleasant.
- Increases Coil Longevity: Proper priming reduces the likelihood of burning out your coil prematurely, allowing it to last longer.
- Improves Flavor: A well-primed coil absorbs e-liquid evenly, which enhances the flavor and ensures a smooth vaping experience.
- Protects the Coil from Damage: If you vape on a dry wick, it can damage the coil, leading to burnt cotton and a ruined vaping experience.
Now that you know why priming is crucial, let’s break down the steps for priming your coil correctly.
Step-by-Step Guide: How to Prime a Coil
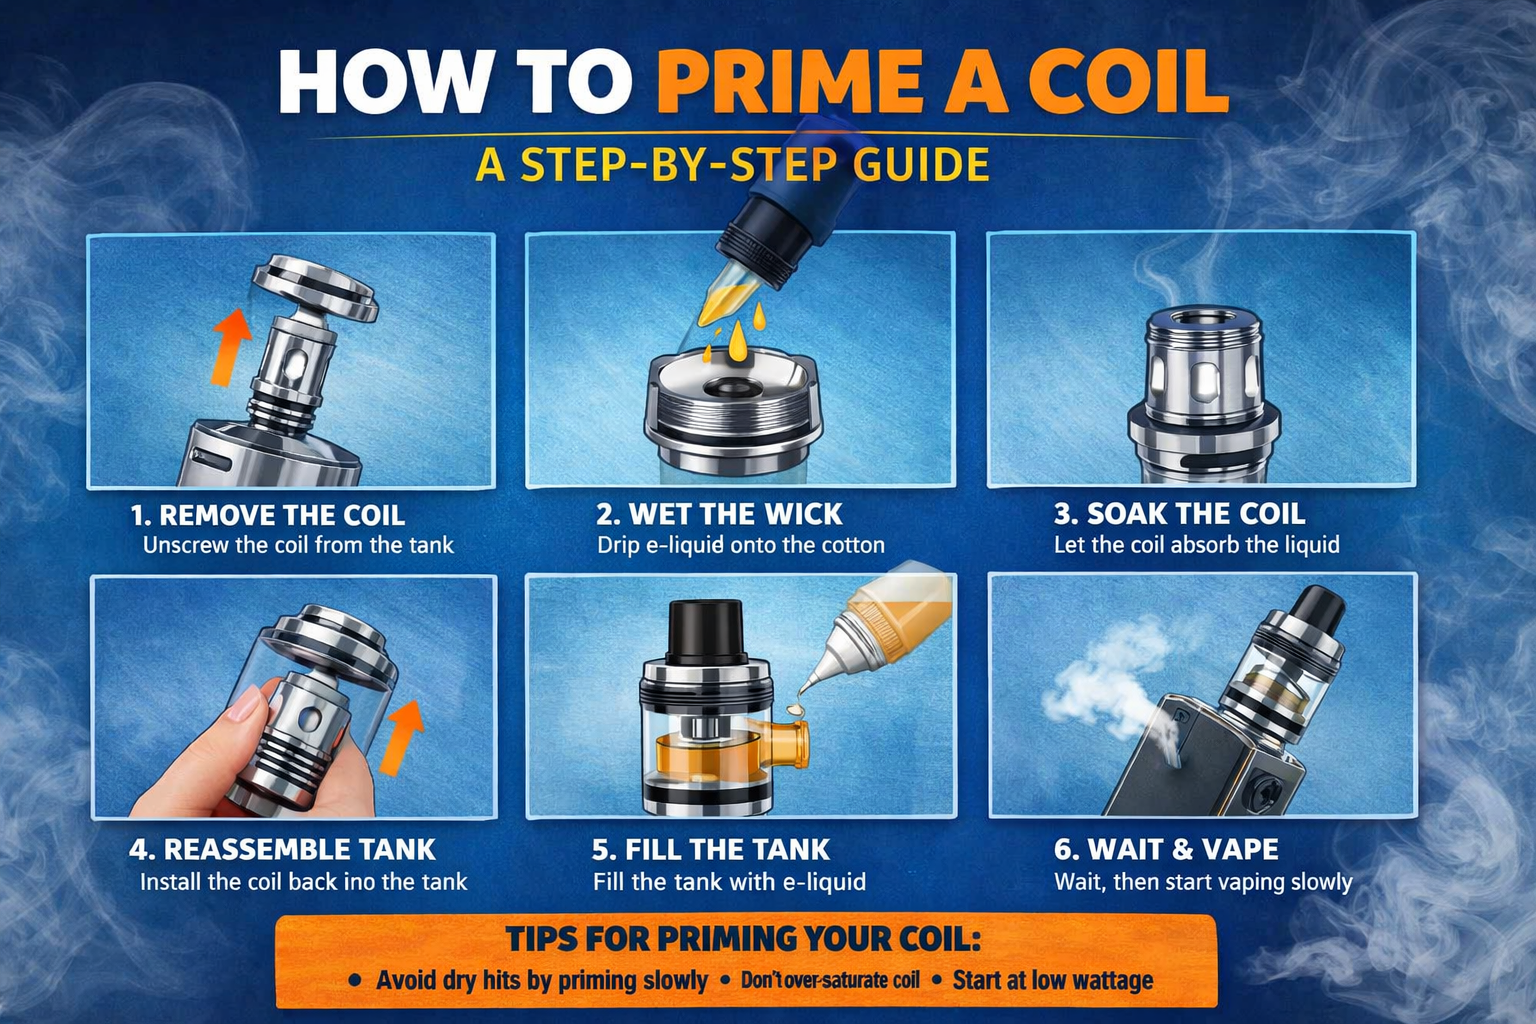
1. Remove the Coil from the Tank
Start by removing the coil from your tank or atomizer. This gives you better access to the wick and ensures you can work on it without making a mess. Most coils are simply screwed into place, so gently unscrew the coil and set it aside.
2. Inspect the Coil and Wick
Before priming, inspect the coil for any visible damage. Check if the wick (typically made of cotton) is in good condition and free from any tears or holes. If you notice any damage, it’s best to replace the coil before continuing.
3. Drip E-liquid Directly onto the Wick
Once you’ve removed and inspected the coil, drip a few drops of e-liquid directly onto the exposed cotton wick. Be sure to focus on the cotton around the coil’s center, as this is where the e-liquid needs to be absorbed first.
- Drip a few drops onto each side of the wick (not just the center) to ensure an even soak.
- Do not oversaturate the wick. A few drops are usually enough—aim for just enough liquid to moisten the cotton without spilling over the coil.
4. Soak the Coil’s Wick Thoroughly
After applying the e-liquid, gently press the cotton down with your fingers or a tool to ensure that the e-liquid is absorbed into the entire wick. Some coils may have multiple wicks, so make sure all wicks are properly saturated. Let the coil sit for a minute or two to ensure full absorption before reassembling your vape tank.
5. Reassemble Your Tank
Once the wick is fully primed, carefully reinstall the coil back into your tank or atomizer. Ensure it’s tightly secured but not overtightened. Some tanks may require the coil to be screwed into the base or positioned in a specific way, so check the manufacturer’s instructions for proper installation.
6. Fill Your Tank with E-liquid
Now that the coil is primed and the tank is ready, fill your tank with e-liquid. Be sure not to overfill the tank—leave a small gap at the top to prevent any e-liquid from spilling when you reassemble the tank.
7. Let the Tank Sit
After filling your tank, let the entire setup sit for about 5 to 10 minutes. This allows the e-liquid to fully saturate the coil and wick before you start vaping.
8. Start Vaping Slowly
After the waiting period, start vaping at a low wattage to allow the coil to gradually heat up. Avoid cranking the wattage up immediately, as this can burn the wick and create a dry hit. Increase the wattage gradually as you begin to take more puffs to ensure an even heating process.
Tips for Priming Your Coil
- Avoid Over-Priming: Dripping too much e-liquid onto the coil can cause flooding, which may result in gurgling or leaking from the airflow holes.
- Use High-VG E-liquid for Better Absorption: If you’re using a high-VG e-liquid, priming can take a bit longer since VG is thicker. Allow extra time for absorption if needed.
- Avoid Dry Hits: Always check that the coil is fully saturated before using it. A dry hit can cause an unpleasant burnt taste and damage the coil.
- Be Patient: Don’t rush the priming process. Giving the coil enough time to soak properly ensures the best flavor and performance.
How Often Should You Prime Your Coil?
You should prime your coil every time you replace it. Additionally, it’s a good idea to re-prime your coil if you haven’t used your vape in a while. When the e-liquid level in the tank gets low, you may also want to give the coil a quick re-drip of e-liquid before continuing to vape to ensure consistent performance.
Conclusion: Mastering the Art of Priming Your Coil
Priming a coil is a simple but crucial step to ensuring that your vape performs optimally and provides great flavor. By following the proper steps, you’ll avoid dry hits, protect your coils, and enjoy a smooth vaping experience. Whether you’re a beginner or a seasoned vaper, understanding how to prime your coil will enhance your overall vaping experience, making every puff more satisfying.