


In today’s fast-paced digital world, desktop computers are essential tools for both personal and professional use. Whether you’re using your desktop for work, gaming, or entertainment, the experience can quickly be interrupted when a malfunction occurs, particularly if your hard drive is damaged. Hard drive failure is one of the most common issues that can affect your desktop system, but fortunately, there are ways to troubleshoot and repair it. If your 2026 desktop computer system is malfunctioning due to a damaged hard drive, this article will guide you through the steps to assess, repair, or replace the drive and restore your system to working condition.
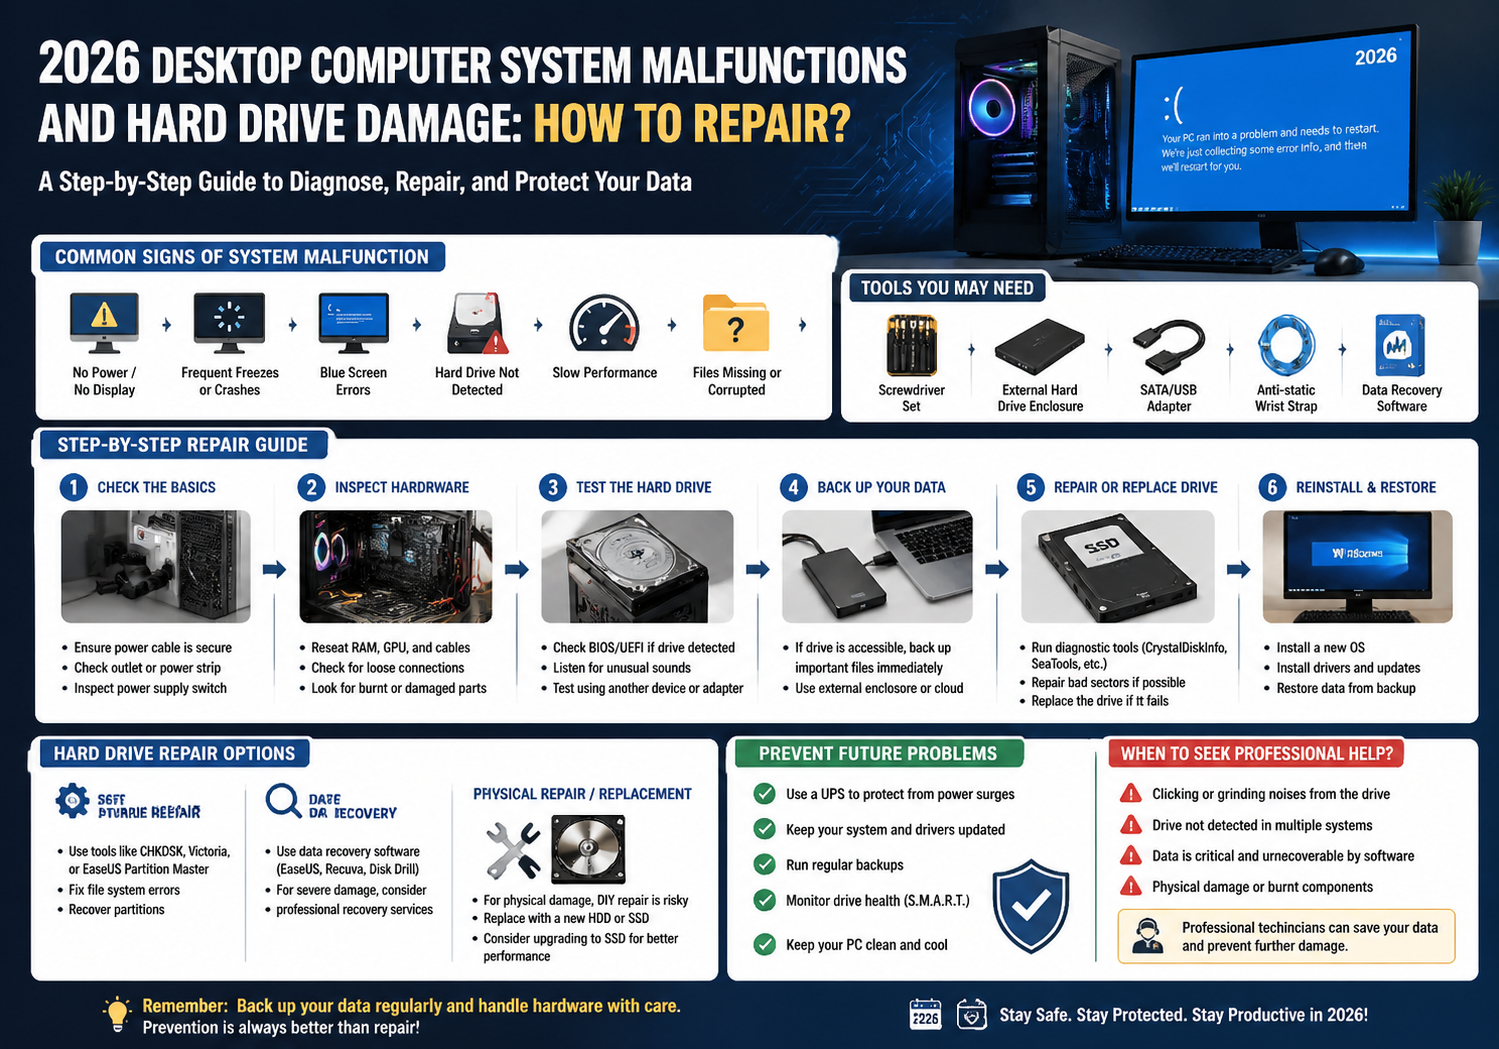
Signs of a Damaged Hard Drive
Before diving into the repair process, it’s essential to confirm that the hard drive is indeed the source of the problem. Here are some common signs of a damaged hard drive:
- Frequent System Crashes or Freezes: If your computer is constantly crashing, freezing, or displaying error messages, it could be a sign that your hard drive is failing.
- Unusual Noises: A clicking or grinding sound coming from your computer’s tower is often a sign of physical damage to the hard drive’s components.
- Slow Performance: If your computer is suddenly running slower than usual, especially when accessing files, it may indicate that the hard drive is deteriorating.
- Corrupted Files: Files that become corrupted or inaccessible could indicate that sectors of the hard drive are damaged.
- Failure to Boot: If your computer gets stuck at the boot screen or displays “boot device not found” errors, it may indicate a serious issue with the hard drive.
Steps to Repair a Damaged Hard Drive
Repairing a damaged hard drive depends on the nature of the issue—whether it’s software-related, hardware-related, or the drive is physically failing. Below are the steps to take for each scenario.
1. Software Repairs for Corrupted or Logical Issues
If your hard drive is not physically damaged but shows signs of software corruption or logical errors, you can attempt to repair it using built-in tools or third-party software.
Using Windows Built-In Tools:
- CHKDSK (Check Disk): This is a built-in Windows utility that can scan for and repair logical issues with your hard drive.
- Open the Command Prompt as an administrator.
- Type
chkdsk /f C:(replace “C:” with the correct drive letter if necessary). - Press Enter and allow CHKDSK to scan and fix any errors. If prompted to restart, allow it to do so.
- S.M.A.R.T. (Self-Monitoring, Analysis, and Reporting Technology): This system can help identify potential problems with the hard drive. You can check the health of your drive using third-party software like CrystalDiskInfo, which can read the SMART status of the drive and alert you to any abnormalities.
Using Third-Party Tools:
- Recuva (for file recovery): If files are corrupted or lost due to hard drive issues, tools like Recuva can help recover deleted files or restore inaccessible data.
- EaseUS Data Recovery Wizard: This software is useful for recovering files from a damaged hard drive, whether it’s due to accidental deletion, corruption, or formatting issues.
2. Hardware Repairs for Mechanical Issues
If the hard drive is physically damaged, it will likely require hardware intervention. These types of issues are much harder to fix at home, but there are steps you can take.
Step 1: Backup Data (If Possible)
If the hard drive is still partially operational, try to back up any important data before attempting repairs or replacing the drive. You can connect the damaged drive to another working computer via a USB-to-SATA adapter or external hard drive enclosure to recover files.
Step 2: Inspect and Reconnect
Sometimes, a hard drive may appear to be damaged due to loose connections or power issues. Here’s how you can check:
- Turn off your desktop and unplug it from the power source.
- Open the case and locate the hard drive.
- Ensure that the power and data cables are properly connected. If they appear loose or disconnected, reconnect them securely.
If the issue persists, the hard drive itself may be the cause.
Step 3: Test the Hard Drive on Another System
If you suspect physical damage, you can test the hard drive on another desktop or laptop system. This will help confirm if the issue is with the drive itself or if it’s a problem with the system’s motherboard or other components.
Step 4: Seek Professional Help
If your hard drive is making unusual noises (e.g., clicking or grinding sounds), it’s most likely a mechanical failure. Unfortunately, mechanical issues cannot be fixed at home. In this case, you should contact a professional data recovery service. These services have specialized tools to repair or recover data from physically damaged drives, but they can be costly.
3. Replacing a Faulty Hard Drive
If your hard drive is beyond repair, the next step is to replace it. Here’s how you can proceed:
Step 1: Choose a Replacement Hard Drive
When replacing your hard drive, make sure to choose a compatible model with your 2026 desktop system. Consider the following options:
- HDD vs SSD: If you’re looking for better performance, consider upgrading to a Solid-State Drive (SSD). SSDs are faster and more durable than traditional HDDs.
- Capacity: Choose a drive with sufficient storage for your needs, whether you need just a few terabytes or a larger storage solution.
Step 2: Install the New Hard Drive
- Power down your desktop and disconnect all cables.
- Open the case and remove the damaged hard drive by loosening any screws or brackets securing it in place.
- Insert the new hard drive into the same slot and reconnect the power and data cables.
- Secure the new drive with screws or brackets.
Step 3: Reinstall the Operating System
Once the new hard drive is installed, you’ll need to reinstall the operating system (OS) like Windows or Linux. You can do this using a bootable USB drive or installation disc:
- Insert the bootable USB or disc and boot from it.
- Follow the installation prompts to set up your OS on the new hard drive.
Step 4: Restore Backed-Up Data
If you previously backed up your data, you can now restore your files to the new hard drive. This may involve transferring data from an external storage device, cloud storage, or using data recovery software if you had issues with the original drive.
Preventing Future Hard Drive Failures
To minimize the risk of future hard drive issues, here are some proactive steps you can take:
- Regular Backups: Always back up your data regularly, either through cloud services or external drives, to prevent data loss in the event of failure.
- Use a Surge Protector: Protect your computer from power surges that could damage your hard drive by using a surge protector or an uninterruptible power supply (UPS).
- Monitor Drive Health: Use disk monitoring tools to keep track of your hard drive’s health and performance.
- Defragment and Clean Up: Regularly defragment HDDs (if you’re using them) and run disk cleanup tools to optimize performance.
Conclusion
A malfunctioning hard drive in your 2026 desktop computer system can be a frustrating experience, but it’s often repairable. Whether the issue is software-related or due to physical damage, understanding the steps to troubleshoot, repair, or replace the hard drive can save you time and money. If all else fails and the drive is beyond repair, replacing it with a new model and reinstalling the OS is a reliable way to restore your system. Always ensure you have a good backup strategy in place to avoid catastrophic data loss in the future.