


Vaping is an enjoyable experience for many, but to maintain the quality of your vape and ensure longevity, regular cleaning is essential. A refillable vape pod can accumulate residue, old e-juice, and grime, all of which can affect the taste and functionality of your device. Cleaning your refillable vape pod not only improves performance but also ensures a smoother vaping experience.
In this article, we’ll guide you through the process of cleaning a refillable vape pod, providing tips on how to do it effectively and safely.
Why Clean Your Refillable Vape Pod?
Before diving into the cleaning process, it’s important to understand why it matters. Here are a few reasons to clean your refillable vape pod regularly:
- Improved Flavor: Residue buildup from old e-juice can affect the flavor, leaving a burnt or stale taste. Cleaning your vape pod ensures that every puff is fresh and flavorful.
- Better Vapor Production: A clean pod ensures that airflow isn’t blocked and your vape device performs optimally, giving you smooth vapor production.
- Longevity of the Device: Regular cleaning prevents the buildup of gunk and old e-liquids, which can clog the pod and cause malfunctions, extending the life of your device.
- Hygiene and Safety: A clean pod reduces the chance of harmful bacteria or mold growth, ensuring a safe and hygienic vaping experience.
Supplies You’ll Need to Clean Your Vape Pod
Before starting, gather the following supplies:
- Paper towels or microfiber cloth: For wiping and drying the pod.
- Cotton swabs: For cleaning hard-to-reach areas.
- Isopropyl alcohol (preferably 70% or higher): A mild disinfectant that helps remove residue.
- Warm water: For rinsing the pod.
- Q-tips: For detailed cleaning of the pod’s components.
- A small brush (optional): For removing dirt from tight spaces.
Step-by-Step Guide to Clean a Refillable Vape Pod
1. Disassemble Your Vape Pod
Before you start cleaning, make sure to turn off your vape device. Remove the refillable pod from the mod, ensuring that there is no e-liquid left in the pod. Dispose of the old e-liquid responsibly and avoid flushing it down the drain.
2. Rinse the Pod Under Warm Water
Take the pod and rinse it under warm water to remove any leftover e-liquid. Gently shake the pod to dislodge any excess liquid. Be careful not to get water in the coil area, as moisture could damage the coil or affect the performance of your vape.
3. Use Isopropyl Alcohol for Deeper Cleaning
Once the pod is rinsed, take a cotton swab dipped in isopropyl alcohol and carefully clean around the pod’s opening and inner components. Alcohol will help break down the sticky e-liquid residue. Avoid soaking the entire pod in alcohol as it could damage internal components. Focus on cleaning areas that are more difficult to reach, such as corners and crevices, with the swab.
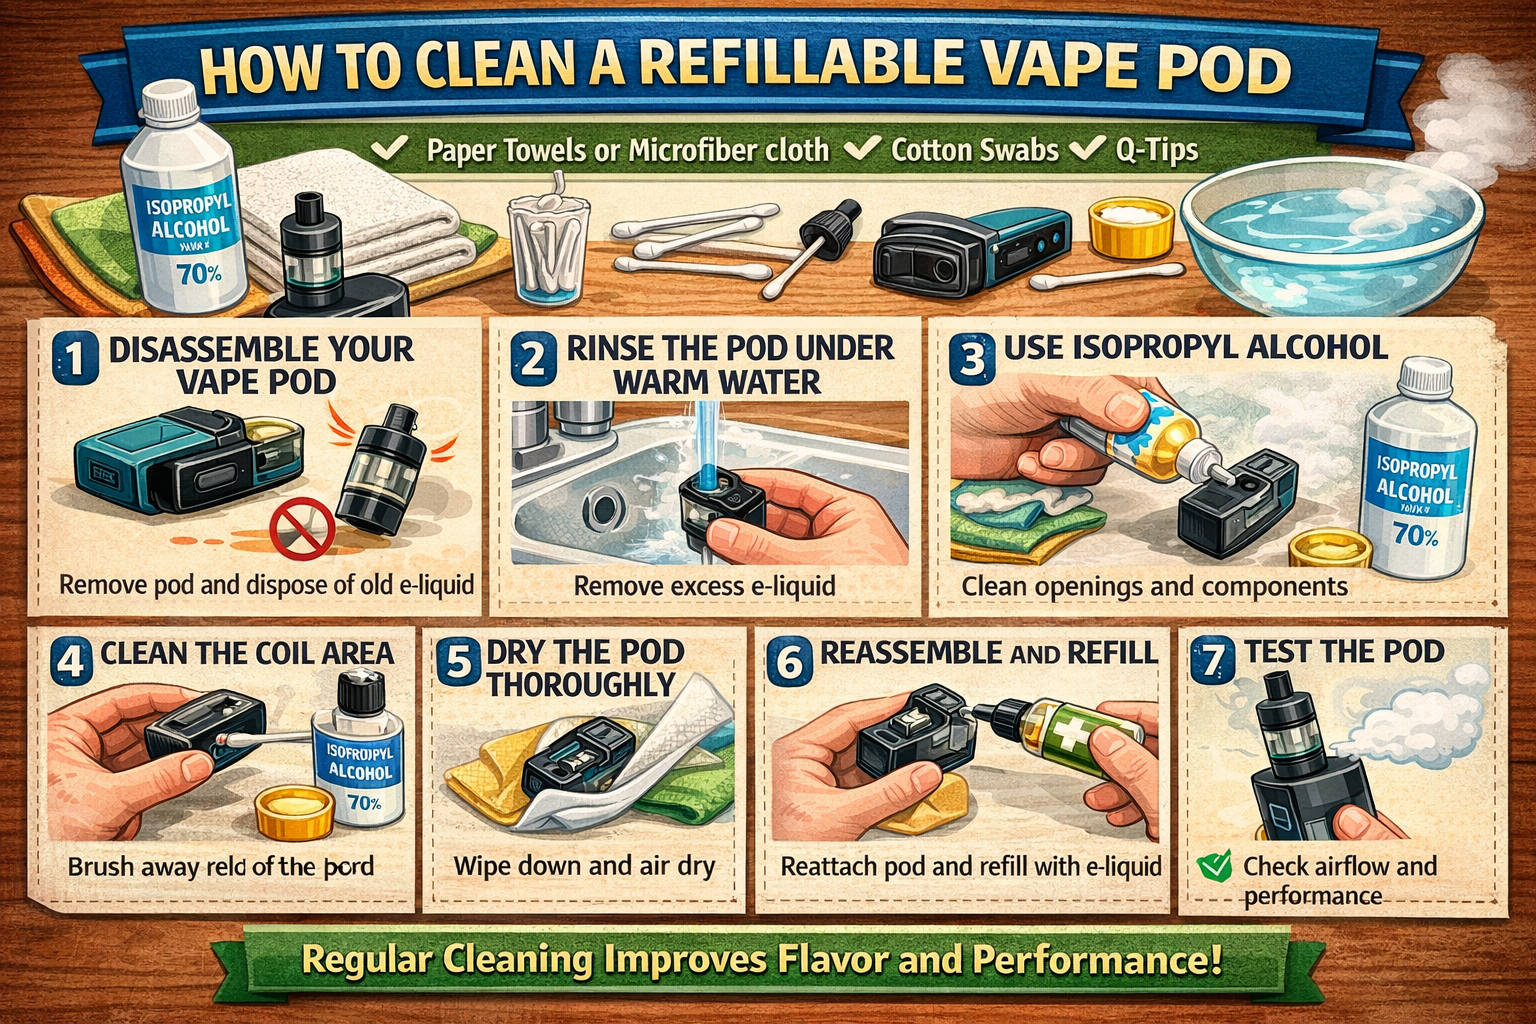
4. Clean the Coil Area
If your refillable pod has a removable coil, take it out and clean it separately. You can soak the coil in warm water to remove any buildup. After soaking, use a cotton swab to clean the coil gently. Be cautious, as excessive cleaning or scrubbing may damage the coil. If you notice that the coil is heavily worn or corroded, it may be time to replace it.
5. Dry the Pod Thoroughly
After cleaning, ensure the pod is completely dry. Use a microfiber cloth or paper towel to dry the pod thoroughly. It’s essential to remove any remaining moisture to avoid issues when you refill the pod with e-liquid. Leave the pod to air dry for a few hours if necessary.
6. Reassemble and Refill the Pod
Once the pod is dry, carefully reassemble the pod and the device. Refill the pod with your desired e-liquid, ensuring that you don’t overfill it. Be sure to check for any leakage before using the device.
7. Test the Pod
Before you start vaping, take a few dry puffs to check the airflow and make sure everything is functioning properly. If you notice any leaks or issues with performance, disassemble the pod again and make any necessary adjustments.
Tips for Maintaining Your Refillable Vape Pod
- Regular Cleaning: Clean your refillable pod at least once every week or two, depending on how frequently you use it. This will prevent residue buildup and maintain the taste and performance of your device.
- Use the Right E-Liquid: Using e-liquids with a higher VG (vegetable glycerin) content can lead to more residue buildup. If you notice quicker accumulation, consider switching to a thinner e-liquid with a higher PG (propylene glycol) content.
- Replace Coils as Needed: Regularly replacing the coils in your vape pod will help maintain flavor and vapor production. Coils wear out over time and become less efficient.
- Avoid Overfilling the Pod: Always ensure you don’t overfill your pod. This can lead to leaks and excessive buildup of e-liquid in places it shouldn’t be.
Common Issues and Solutions
1. Poor Flavor After Cleaning
If you experience poor flavor even after cleaning, check the coil. It may need to be replaced. Old coils tend to lose flavor and vapor production efficiency over time.
2. Leaking Pod
If your pod is leaking after cleaning, check if the pod is properly sealed and whether the rubber gaskets are intact. Sometimes, improper assembly after cleaning can lead to leakage.
3. Gurgling Sound
A gurgling sound typically happens when the pod is overfilled, or the coil is flooded with e-liquid. If this happens, remove the pod from the device, drain any excess e-liquid, and dry it properly before reusing.
Conclusion: The Importance of Regular Cleaning
Cleaning your refillable vape pod is essential for maintaining the performance and longevity of your device. It’s an easy task that pays off by ensuring your vape provides the best possible flavor and vapor production. By following these simple steps, you can keep your vape pod in top condition, prolong its lifespan, and enhance your overall vaping experience.