


Replacing the hard drive in your desktop computer may seem like a daunting task, but with the right guidance and a little patience, it can be a straightforward process. Whether you’re upgrading to a larger hard drive or replacing a failing drive, this step-by-step guide will walk you through the entire procedure. This guide is tailored for 2026, reflecting current hardware standards and practices.
By the end of this article, you’ll be ready to replace your desktop computer’s hard drive confidently, ensuring better performance and more storage capacity for your device.
Why Replace Your Hard Drive?
There are several reasons why you might need to replace the hard drive in your desktop computer:
-
Upgrading for More Storage: As files, applications, and games become larger, your current hard drive might not offer enough space.
-
Improving Speed: Older hard drives, especially traditional HDDs (Hard Disk Drives), can be much slower than modern SSDs (Solid State Drives). Upgrading to an SSD can significantly improve boot times and system performance.
-
Failed Hard Drive: If your hard drive is making strange noises, showing bad sectors, or you’ve been experiencing data corruption, it’s time to replace it.
-
Data Backup: Replacing the hard drive is a great time to make a full backup of your data and transition to a better drive.
Step-by-Step Guide: Replacing the Hard Drive in a Desktop Computer (2026)
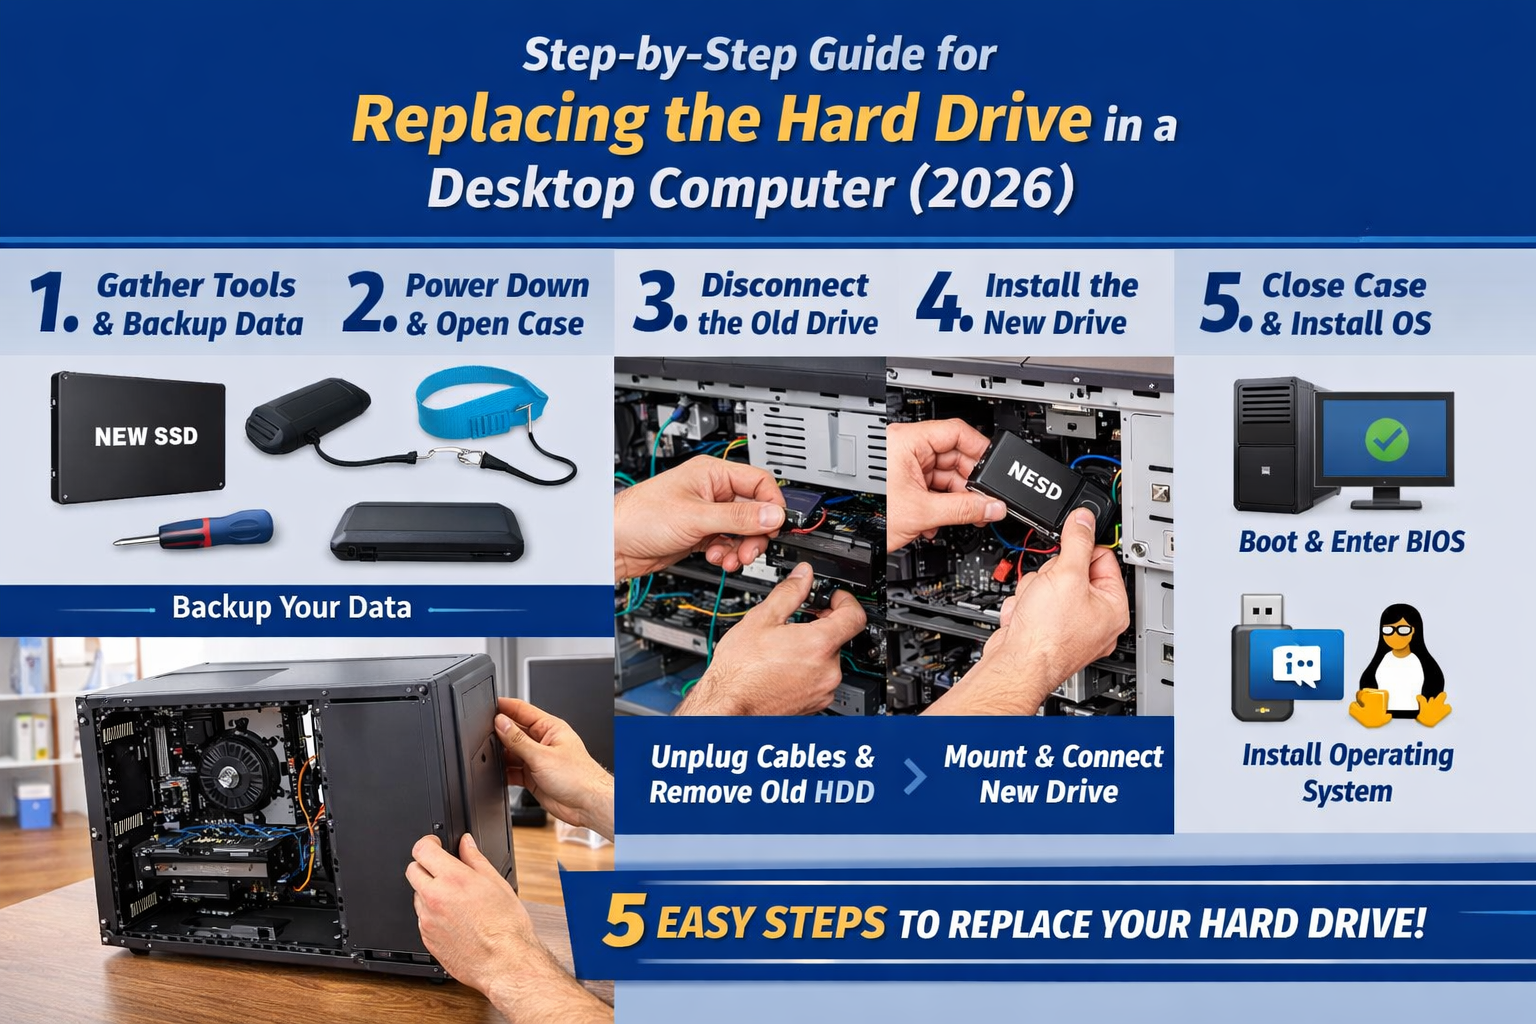
Step 1: Gather Your Tools and Backup Your Data
Before you begin the replacement process, gather all the necessary tools:
-
New hard drive (HDD or SSD): Choose a drive that meets your needs in terms of storage capacity, speed, and type (HDD or SSD).
-
Screwdriver: Typically a Phillips-head screwdriver is all you’ll need.
-
Antistatic wrist strap: To prevent static electricity from damaging sensitive computer components.
-
Data backup solution: Ensure all important data is backed up. Use an external hard drive or a cloud service for this.
It’s crucial to back up your data before replacing the hard drive to avoid any data loss. Once your files are secure, you’re ready to move to the next step.
Step 2: Power Down and Open the Computer Case
-
Shut down your computer and unplug it from the power source to avoid any electrical hazards.
-
Open the case: Most desktop cases have screws or latches that allow you to remove the side panel. Use your screwdriver (if necessary) to open the side panel of your desktop case. If you’re unsure of how to open your case, consult the manufacturer’s manual.
Tip: Ground yourself by touching a metal part of the case to discharge any static electricity before you handle internal components.
Step 3: Disconnect the Old Hard Drive
Once you’ve opened the case, locate the existing hard drive. It will typically be mounted in a drive bay. Here’s how to disconnect it:
-
Unplug the power cable and data cable (SATA or IDE) from the back of the old hard drive.
-
If your hard drive is secured with screws, use the screwdriver to remove the screws holding the hard drive in place.
-
Carefully slide the hard drive out of the drive bay. If it’s a traditional 3.5-inch drive, it might be a bit snug, so apply a little gentle force, but avoid damaging any components.
Step 4: Install the New Hard Drive
Now it’s time to install your new hard drive.
-
Position the new hard drive: Slide the new hard drive into the drive bay where the old one was located. If it’s an SSD, it might be mounted using a 2.5-inch to 3.5-inch adapter (some drive bays only support 3.5-inch HDDs).
-
Secure the hard drive: Use the screws you removed earlier (or new screws if necessary) to secure the hard drive firmly in place. Most desktop cases have sled mounts or screw holes to attach the drive.
-
Connect the cables: Connect the power cable and the data cable (usually SATA) to the back of the new hard drive. Ensure that both connections are secure.
Tip: If you’re replacing your old HDD with an SSD, you may want to connect it via SATA III for better performance. Make sure your motherboard supports the type of drive you’re installing.
Step 5: Close the Case, Boot Up, and Install the Operating System
After the hard drive is securely connected, you can close the case and power up your desktop.
-
Close the case: Reattach the side panel and screw it back in place.
-
Power on the computer: Plug your computer back in and power it up. You should immediately enter the BIOS/UEFI settings (by pressing a specific key during boot, usually DEL or F2).
-
Check if the new hard drive is detected: Inside the BIOS, check the boot order and ensure the new drive is recognized by the system.
-
Install the operating system: If you’re replacing a failed hard drive, you will need to install a new OS. Use a bootable USB drive with Windows or Linux installation files to install your operating system. If the old drive was cloned onto the new one, you can skip the installation and simply boot into your system.
Tip: Consider using a tool like Clonezilla or Macrium Reflect to clone your old drive onto the new one if you’re not starting from scratch with a fresh OS installation.
Conclusion
Replacing the hard drive in a desktop computer doesn’t have to be complicated. By following these 5 easy steps, you can upgrade your storage capacity, boost system speed, or replace a failing hard drive without stress. In 2026, SSD technology is the go-to choice for improving overall performance, so consider upgrading to an SSD for faster boot times and enhanced responsiveness.
Remember to back up your data, take your time during installation, and follow safety precautions to ensure your computer stays in good working order. Once you’ve completed the process, your desktop should be running smoother and faster than ever before!
With the right tools, a little patience, and this step-by-step guide, you’ll be ready to tackle the hard drive replacement like a pro!
Reminder: Seek Professional Help if Unsure
If you’re unsure about how to replace the hard drive in your desktop computer or lack experience with internal hardware, it’s best to consult a professional technician. While replacing a hard drive is a manageable task for experienced users, improper handling can lead to:
-
Damage to internal components
-
Data loss if the process is not done correctly
-
Voiding warranties on hardware or the computer itself
If you’re not confident in your ability to complete the process safely and efficiently, please have a qualified technician check or replace the hard drive for you. It’s always better to be safe than sorry when working with your valuable equipment!